Building or upgrading a PC is exciting, but ensuring all components work together can be tricky. This guide simplifies the process by outlining crucial compatibility factors:
- CPU and Motherboard: Socket type, chipset, BIOS version, TDP
- RAM: Type, speed, capacity, configuration (dual-channel/quad-channel)
- GPU and PCIe: PCIe version, physical fit, power requirements
- Storage Devices: Interface (SATA/NVMe), form factor (2.5-inch/M.2), capacity
- Power Supply Unit (PSU): Wattage, 80+ efficiency rating, modular vs. non-modular
- Case Compatibility: Motherboard size, GPU clearance, CPU cooler clearance, radiator support
By understanding these key areas, you can ensure a smooth build and optimal performance for your PC.
1. CPU and Motherboard Compatibility
The CPU (Central Processing Unit) and motherboard are the PC’s foundation. Here’s what to consider:
- Socket Type (Image of LGA 1700 and AM5 sockets): CPUs fit specific sockets. For example, Intel’s 12th, 13th, and 14th Gen Core processors require an LGA 1700 motherboard, while AMD’s Ryzen 7000 series needs an AM5 motherboard. Using an incompatible CPU can damage both components.
- Chipset: The motherboard chipset supports specific CPU features. Higher-end CPUs benefit from chipsets with overclocking capabilities (like Intel Z790 or AMD X670) and more PCIe lanes for multiple GPUs or NVMe drives. Mainstream chipsets (like Intel B760 or AMD B650) offer lower prices but lack these features.
- BIOS Version: Older motherboards may need a BIOS update to support newer CPUs. Check the motherboard manufacturer’s website for CPU support lists and BIOS update instructions. For instance, an older B660 motherboard might require a BIOS update for 13th-generation Intel CPUs.
- TDP (Thermal Design Power): This represents the amount of heat the CPU generates. The CPU cooler must be able to handle the CPU’s TDP. Refer to the “Cooling Solutions” section for more information.
- Thermal Throttling: CPUs can reduce their performance (thermal throttling) to prevent overheating. This is often caused by insufficient cooling or poor airflow. Ensure your cooler and case provide adequate cooling to prevent performance drops.
- CPU Cooler Compatibility: It’s important to ensure your chosen CPU cooler is compatible with the motherboard socket. Some coolers might require specific mounting brackets that are compatible with the motherboard socket. Check the cooler manufacturer’s website for compatibility information.
- Futureproofing: When choosing a motherboard, consider future upgrade paths. For example, a motherboard with multiple PCIe slots can support future GPU upgrades or additional NVMe storage.
CPU and Motherboard Compatibility Overview: Matching Sockets, Chipsets, and BIOS Requirements:
| Brand | CPU Series | Socket Type | Compatible Chipsets | BIOS Update Needed? |
|---|---|---|---|---|
| Intel | 12th-14th Gen Core | LGA 1700 | Z790, B760, H770, etc. | Yes (for some older boards) |
| AMD | Ryzen 7000 Series | AM5 | X670, B650, A620, etc. | No |
2. RAM Compatibility
RAM (Random Access Memory) significantly impacts performance. Here’s what to ensure:
- Type (Image of DDR4 and DDR5 RAM modules): Motherboards support specific RAM types, like DDR4 or DDR5. They are not interchangeable. Always check the motherboard specifications.
- Speed (MHz): RAM speed must be compatible with both the CPU and motherboard. A DDR5-6000 kit might not run at its advertised speed on a motherboard that only officially supports up to DDR5-5600.
- Capacity and Configuration: Ensure the motherboard supports the total RAM capacity and the number of modules. Dual-channel (two modules) or quad-channel (four modules) configurations offer better performance than single-channel.
- XMP/EXPO Profiles: These are pre-configured settings that allow RAM to run at its advertised speeds. Enable them in the BIOS for optimal performance.
Selecting the appropriate amount of RAM is crucial for system performance. Determine the right amount of RAM for your needs in our guide on RAM Bottlenecks: How Much RAM Do You Really Need?.
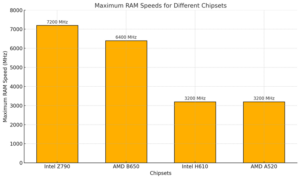
Comparison of Maximum Supported RAM Speeds (MHz) Across Popular Chipsets: Highlighting the performance capabilities of Intel Z790, AMD B650, Intel H610, and AMD A520 for various DDR generations.
3. GPU and PCIe Compatibility
The Graphics Processing Unit (GPU) is essential for tasks such as gaming, video editing, and 3D rendering. Understanding GPU and PCIe (Peripheral Component Interconnect Express) compatibility is crucial to ensure optimal performance. Here’s what to consider:
1. PCIe Version Compatibility
- PCIe 4.0 vs. PCIe 3.0: Modern GPUs typically use PCIe 4.0 or PCIe 5.0 to take advantage of faster data transfer speeds. While these newer versions offer better performance, they are backward compatible. This means a PCIe 4.0 GPU can still be installed in a PCIe 3.0 slot, but you might experience reduced performance, especially in bandwidth-intensive tasks such as 4K gaming or video rendering.
- PCIe 5.0: This version offers double the bandwidth of PCIe 4.0, which is ideal for the most powerful GPUs and future-proofing, especially for applications like AI and high-end gaming. However, PCIe 5.0 GPUs will still function in older PCIe slots, albeit at a reduced speed.
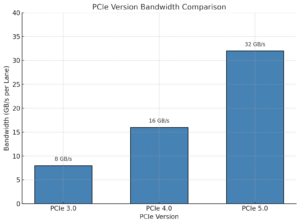
PCIe Version Bandwidth Comparison: Displaying the per-lane data transfer speeds for PCIe 3.0 (8 GB/s), PCIe 4.0 (16 GB/s), and PCIe 5.0 (32 GB/s), highlighting the improvements in bandwidth with each generation.
2. Physical Fit
- GPU Size: GPUs vary significantly in size, and it’s essential to ensure that the GPU physically fits inside your PC case. Many high-end GPUs can be quite long and wide, and the clearance inside the case might not always be enough.
- Tip: Check the case’s GPU length clearance specifications, which are typically available in the case’s manual or product page. Additionally, some GPUs require additional space for cooling systems (like large fans or liquid cooling systems) to work efficiently.
- PCIe Slot Availability: Most GPUs require a PCIe 16x slot, usually the topmost one on the motherboard. Ensure that there is no obstruction from other components, such as RAM or large heatsinks.
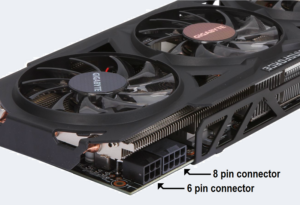
GPU power connectors: 6-pin, 8-pin
3. Power Requirements
- Wattage: Modern GPUs often require more power than your standard components, with mid to high-end GPUs requiring anywhere from 150W to 350W or more. Check the TDP (Thermal Design Power) rating of your GPU to ensure that your PSU provides enough wattage to handle your entire system.
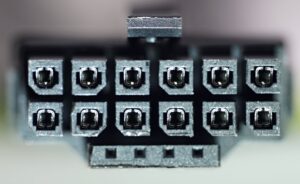
- Power Connectors: GPUs need dedicated power connectors. Common configurations are 6-pin, 8-pin, or even 12+4 pin connectors, depending on the GPU’s power demands. Ensure your PSU has these connectors and enough to meet the GPU’s needs.
- Example: A high-end NVIDIA RTX 4080 might require a 12+4 pin connector or an adapter from an 8-pin connector. Make sure that your PSU supports the appropriate connectors or that you can use an adapter if needed.
4. BIOS and Firmware
- BIOS Updates: Sometimes, new GPUs may require a motherboard BIOS update to function properly. Ensure your motherboard has the latest BIOS version, especially when using cutting-edge GPUs or older motherboards with PCIe 3.0 slots.
Quick Checklist for GPU Installation:
- Confirm PCIe Version: Is your motherboard PCIe 4.0 or 5.0? Ensure the slot matches the GPU’s capabilities.
- Check Physical Fit: Does the GPU fit inside the case without obstructing other components? Measure case clearance.
- Check Power Requirements: Does your PSU have the necessary wattage and connectors (6-pin, 8-pin, or 12-pin)?
- Update BIOS: Ensure your motherboard BIOS is up to date to support the latest GPU models.
4. Storage Device Compatibility
Understanding storage device compatibility is crucial:
- Interface:
- SATA: Used for traditional HDDs and some SSDs.
- NVMe: A faster protocol that uses the PCIe bus for high-performance SSDs.
- Form Factor (Image of 2.5-inch and M.2 form factors):
- 2.5-inch: Standard size for HDDs and some SSDs.
- M.2: A smaller form factor for SSDs. M.2 slots can support both SATA and NVMe drives. It’s important to understand that M.2 is the slot type, while NVMe is the protocol. An M.2 slot can be SATA-based (slower) or NVMe-based (faster).
- Capacity Support: Most modern motherboards don’t have practical storage capacity limitations, but check the specifications to be sure.
- Number of Drives: Motherboards have a limited number of SATA and M.2 slots. Ensure your chosen motherboard can accommodate the number of storage drives you need for your build.
5. Power Supply Unit (PSU)
The PSU provides power to all your components. Choose wisely:
- Wattage: Use a PSU calculator (available online) to estimate the required wattage based on your chosen components. For example, enter the TDP of your CPU and GPU, along with the wattage of other components, and the calculator will provide a recommended wattage for your PSU. A system with an RTX 4080 GPU and a Ryzen 9 CPU might require a 750W PSU, including some headroom for future upgrades.
- 80+ Efficiency Ratings: These indicate how efficiently the PSU converts AC power to DC power. Higher ratings (Bronze, Silver, Gold, Platinum, Titanium) mean less wasted energy and lower electricity bills.
- Modular vs. Non-Modular: Modular PSUs allow you to connect only the necessary cables, improving cable management and airflow within the case.
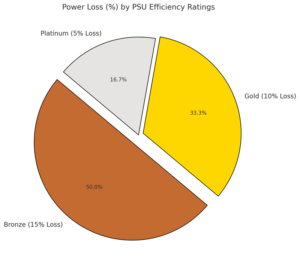
Power Loss by PSU Efficiency Ratings: Comparing the percentage of power lost in Bronze (15%), Gold (10%), and Platinum (5%) 80+ certified PSUs, emphasizing the benefits of higher efficiency.
6. Case Compatibility
The case houses all your components. Consider these factors:
- Motherboard Size: Cases support specific motherboard sizes (ATX, Micro-ATX, Mini-ITX). Ensure your chosen motherboard fits the case.
- GPU Clearance: Check the case’s maximum GPU length to ensure your graphics card will fit without obstruction.
- CPU Cooler Clearance: Check the case’s maximum CPU cooler height. Some tall air coolers may not fit in smaller cases.
- Radiator Support: If you plan on using liquid cooling, ensure the case has mounting points for radiators of the appropriate size.
- Popular Case Sizes: Beginners may find mid-tower cases to be a balanced choice, offering ample room for components and effective airflow. Mid-tower cases often prioritize a balance of size and airflow, making them ideal for most builds, while full-tower cases cater to enthusiasts with extensive cooling and expansion needs.
- Case Fans and Airflow: Ensure your case includes or has space for additional fans to maintain optimal airflow. Proper airflow prevents overheating by efficiently circulating cool air through the system and expelling hot air.
- Aesthetics: Many users prioritize aesthetics when selecting a case. Consider features like tempered glass side panels, RGB lighting, and clean cable management options if the visual appeal of your build is important.
7. Cooling Solutions
Proper cooling is essential for optimal performance and longevity:
- TDP (Thermal Design Power): This represents the amount of heat the CPU generates. The CPU cooler must be able to handle the CPU’s TDP.
- Air Coolers: These use heatsinks and fans to dissipate heat. Case airflow is critical for their efficiency. Ensure your case supports good airflow for optimal performance.
- Liquid Coolers (AIO or Custom Loop): These are more efficient at dissipating heat, especially for high-TDP CPUs. Ensure your case can accommodate the radiator size of your chosen liquid cooler. AIO (All-in-One) liquid coolers are pre-assembled and easier to install, while custom loops offer more flexibility and cooling potential but are more complex.
- Thermal Paste: Applying thermal paste between the CPU and cooler is crucial for efficient heat transfer. Consult the CPU cooler manufacturer’s instructions for proper application.
Cooling Solutions Comparison: Air vs. Liquid Cooling
| Cooling Type | Air Cooling | Liquid Cooling |
|---|---|---|
| Cooling Performance | Good for most builds | Excellent for high-performance setups |
| Noise Levels | Moderate | Lower (depends on pump and fan quality) |
| Maintenance | Minimal | Periodic checks for leaks and fluid levels |
| Cost | Lower | Higher |
8. Other Considerations
- Pre-Built PCs: If building a PC from scratch feels overwhelming, consider pre-built PCs as an alternative. Many manufacturers offer customizable options with compatible components, although this might come at a higher cost.
- Peripherals and Connectivity: Ensure the motherboard has enough USB ports, audio jacks, and other necessary ports for your peripherals.
- Build Quality and Accessibility: Choose a case with sturdy build quality and ease of access to internal components. Features like tool-less drive bays and removable panels can simplify assembly and maintenance.
- Operating System Compatibility: Ensure the operating system you plan to use supports your hardware.
9. Troubleshooting Common Issues
Here are some basic troubleshooting steps:
- No Boot: Check all power connections, RAM seating, and CPU seating. Ensure the power supply is switched on.
- Blue Screens of Death (BSODs): These often indicate RAM incompatibility, driver issues, or overheating. Try running memory diagnostics (like Windows Memory Diagnostic) or checking CPU temperatures.
- GPU Issues:
- Proper Seating: Ensure the GPU is firmly seated in its PCIe slot. You should feel or hear a distinct click when the GPU locks into place. Also, check that the retention clip at the end of the PCIe slot is engaged.
- Power Connectors: Verify that all necessary power connectors are securely attached to the GPU. Most modern GPUs require 6-pin, 8-pin, or multiple connectors from the PSU.
- Correct Output Port: Ensure the monitor is connected to the GPU’s video output port (e.g., HDMI or DisplayPort on the GPU), not the motherboard’s onboard video output. On systems with a dedicated GPU installed, the motherboard’s video output is often disabled by default.
- BIOS Settings: If you’re using a dedicated GPU but see no display, access the BIOS settings and confirm that the correct GPU is set as the primary graphics output device. Look for an option labeled “Initial Display Output” or similar and select the PCIe slot for your dedicated GPU.
- Storage Issues: If a drive is not recognized, check the SATA or M.2 connections. Ensure the drive is enabled in the BIOS and that necessary drivers are installed. For older operating systems, NVMe drives may require additional driver support.
- Overheating Issues: If the system shuts down unexpectedly or performance slows, inspect for dust buildup in fans or vents. Ensure thermal paste is applied correctly, and check that all fans are operational. Improving case airflow by adding more fans or upgrading existing ones can also help.
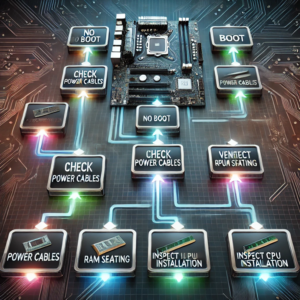
Troubleshooting Decision Tree: A step-by-step guide for diagnosing common PC issues, starting from ‘No Boot’ and branching into checks for power cables, RAM seating, and CPU installation, presented in a modern, high-tech layout.
10. Advanced Considerations
For users exploring more advanced PC building topics, here are additional factors to keep in mind:
Overclocking
- CPU Overclocking: Some CPUs, such as Intel’s “K” series or AMD’s Ryzen processors, support overclocking. Ensure your motherboard has a chipset that supports overclocking (e.g., Intel Z-series or AMD X-series).
- RAM Overclocking: Overclockable RAM requires enabling XMP/EXPO profiles in the BIOS. Some motherboards support fine-tuned control for further performance adjustments.
- Cooling: Overclocking generates extra heat. Ensure your cooling solution—whether air or liquid—can handle the increased thermal output.
Multi-GPU Setups (SLI/CrossFire)
- SLI (NVIDIA) and CrossFire (AMD): While less common today, multi-GPU setups can improve performance in certain workloads. Verify that your motherboard supports multiple GPUs and provides sufficient PCIe lanes for optimal performance.
- Power Supply: Multi-GPU setups require significant power. Ensure your PSU can handle the combined power draw of all GPUs and other components.
- Game/Software Support: Many modern games and applications are optimized for single GPUs. Confirm that your workload benefits from multi-GPU configurations.
11. Glossary (Expanded)
- TDP (Thermal Design Power): The maximum amount of heat a component generates under load, measured in Watts.
- PCIe (Peripheral Component Interconnect Express): A high-speed interface for connecting GPUs, NVMe drives, and other components.
- XMP/EXPO Profiles: Pre-configured memory settings for achieving advertised RAM speeds. XMP is for Intel platforms, and EXPO is for AMD platforms.
- NVMe (Non-Volatile Memory Express): A storage protocol designed for high-speed SSDs using the PCIe interface.
- ATX/Micro-ATX/Mini-ITX: Standardized motherboard sizes. ATX offers the most expansion options, Micro-ATX is slightly smaller with fewer slots, and Mini-ITX is compact and ideal for small form factor builds.
- Overclocking: The process of running a component, such as a CPU or GPU, at higher speeds than its factory default.
- SLI/CrossFire: Technologies for linking multiple GPUs to work together on rendering tasks.
12. Conclusion
Understanding PC component compatibility is the cornerstone of a successful PC build. This guide provides a detailed roadmap for ensuring your components work seamlessly, whether you’re building your first PC or optimizing for advanced features like overclocking and multi-GPU setups. By planning carefully and utilizing resources like PC Part Picker and community forums, you can confidently create a system tailored to your performance needs and future upgrades. Ensuring all components are compatible is key to building a seamless PC. For more insights on avoiding bottlenecks, refer to our Ultimate Guide to PC Bottlenecks and How to Avoid Them.
With the right choices, your PC will not only meet today’s demands but also offer room to grow and adapt to tomorrow’s challenges. Happy building!